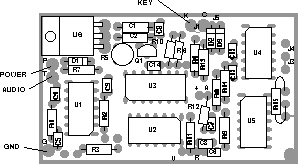
2. Connect black wire to ground.
3. Connect white wire to audio input of transmitter.
4. Find the transmitter key line. With the transmitter not transmitting, the open circuit voltage should be between +4 and +30Vdc. When the transmitter is keyed, this line should read less than 1Vdc. If these conditions are not met, then another point must be found or an auxiliary interface circuit must be built. A 1K pullup to +12 is recommended when the voltage is below 4V open circuit. (For inverted keying systems such as RCA, see special section for RCA). Connect the green wire to this point. The transistor in the IDer can sink up to 100mA and can hold 30Vdc when off. If a relay is controlled by the IDer, be sure it has a protection diode to prevent high voltage transients.
5. Use R5 to set the audio level. Commercial ID requires 30% to 50% modulation. The ID cycle can be started manually by shorting the pads marked "V" and "R" on the board. If the audio cannot be adjusted low enough without difficulty, add a 470K resistor in series with the white wire.
6. Attach board to convenient spot inside your equipment. The cooler the location, the better the reliability even though the IDer is designed for any temperature which is likely to exist in your equipment. In peeling the green backing, it will make eventual removal easier if only 1/4 inch of tape is exposed on each side.
AUDIO FREQUENCY is controlled by R2.
CODE SPEED is controlled by R1.
CALL SIGN Your identifier has a socket for the memory element. The memory element can be ordered from us for $10.00 and replaced in the field. Replace the memory element with pin 1 in the proper position as indicated by the mark on the socket.
MODEL The model can be changed by modifying your IDer in accordance with the chart below.
CTS-2: ID should occur every 12-15 minutes as long as transmitter is keyed. If transmitter has not been keyed for over 15 minutes, the ID will occur immediately upon initial key up. ID never occurs unless transmitter is keyed first by external circuit or manually.
CTS-3: The transmitter IDs every 12-15 minutes regardless of transmitter activity.
CTS-4: The transmitter will not ID during periods of inactivity which are longer than 15 minutes. At the end of such a period, ID will occur immediately upon transmitter key up. During periods of activity, the transmitter will ID every 12-15 minutes immediately upon command of the timer. After the last transmission, the transmitter will ID once more at the end of 12-15 minutes following the last previous ID.
CTS-5: ID occurs at beginning and end of every transmission unless transmission is less than length of ID, in which case only one ID is transmitted.
CTS-2PI: Transmitter IDs at end of transmission if 12-15 minutes has elapsed since last previous ID. ID never occurs except at end of transmission.
CTS-3PI: When the transmitter is not in use, ID occurs every 12-15 minutes. If transmitter is in use when timer commands ID, ID will wait until end of that transmission. Timer is reset by ID.
CTS-4PI: The transmitter will not ID during periods of inactivity which are longer than 15 minutes. At the end of such a period, ID will occur at the end of the first transmission. Subsequently, ID will occur at the end of transmission during which the 12-15 minute time interval expires. Since timer is reset by the actual ID, the interval between ID will depend upon the length of transmissions. After the last of a series of transmissions, the transmitter will ID once more at the end of 12-15 minutes after the last previous ID.
ATS-4: ATS-4 is for amateur use and is supplied with a time interval of 8-10 minutes. Substitute this time in reading the above instructions for CTS-4. Since audio ID levels for amateur use are lower, R7 is supplied at 470K. If this still makes the audio too loud, add a 10M resistor in series with the white wire.
        J1  J3/  J5  R15  D2  D3   C14  U4/1 R12 R13 C12/ R4 C14
            J4                               ##      C13
CTS-2    Y  J4   Y   Y    Y    N   0.1        A    N  N   22K  X
CTS-3    X  J3   Y   Y    X    N   0.1 	GND   A    N  N    X   X
CTS-4    Y  J3   Y   Y    Y    N   0.1        A    N  N   22K  X
CTS-5    Y  J4   X   N    Y    N   NONE       +    N  Y    1K  Y
CTS-2PI  Y  J4   N   Y    N   $$  1800pf      A   **  N   22K  X
CTS-3PI  Y  J3   Y   Y    X    Y   0.1  GND   A    N  N    X   X
CTS-4PI  Y  J3   Y   Y    Y    Y   0.1        A    N  N   22K  X

ATS-4  Same as CTS-4 except R7=470K; R8=75K
##  Denotes pad for high end of R12
X  -  Jumper or part has no effect
Y  -  Jumper or part installed
N  -  no jumper or part installed
$$    D3 is replaced by 0.1 mF capacitor
** In this configuration R13 should match R12. This is 22K, however, if there is diffculty with false triggering, replace both R12 and R13 with 1 Meg resistors.